Serverless Quick Start Guide
A SearchStax Managed Search Serverless deployment is a single Solr collection under your management that shares space with other collections on a Solr cluster managed by SearchStax. The index owners have no access to each other’s data.
The Serverless Indexes are for simple Solr projects that do not require advanced features such as backups, disaster-recovery, alerting, vanity DNS, and others that come with our dedicated Solr deployments. The Serverless indexes are also a fraction of the cost of the dedicated deployments.
This SearchStax Serverless Quick Start page contains everything you need to know to take the SearchStax Managed Search Serverless platform for a test drive. We supply the standard Solr configuration for you to use. We also supply a sample file of documents for you to load and query.
Note that the examples use cURL from a Linux Bash window, but the same examples will work from a Cygwin window on Windows.
Contents of this Solr Guide:
- Set Up an Account
- Create a Serverless Index
- Obtain the Data File
- Upload Documents to Solr
- Search the Index
1. Set Up an Account
To sign up as a SearchStax Serverless Index user, go to the SearchStax Managed Search service Free-Trial page. You may create a single index and experiment with it for 14 days, free of charge. No credit card number is required.
Account creation involves registering your email address and providing a password. Our system will send an activation email to you. Once you respond, you can log into SearchStax Managed Search.
2. Create a Serverless Index
Serverless indexes are created from the SearchStax Managed Search Dashboard.
Navigate to the Serverless Infrastructure screen. When there are no existing Serverless Indexes, the system goes directly to the New Index screen.
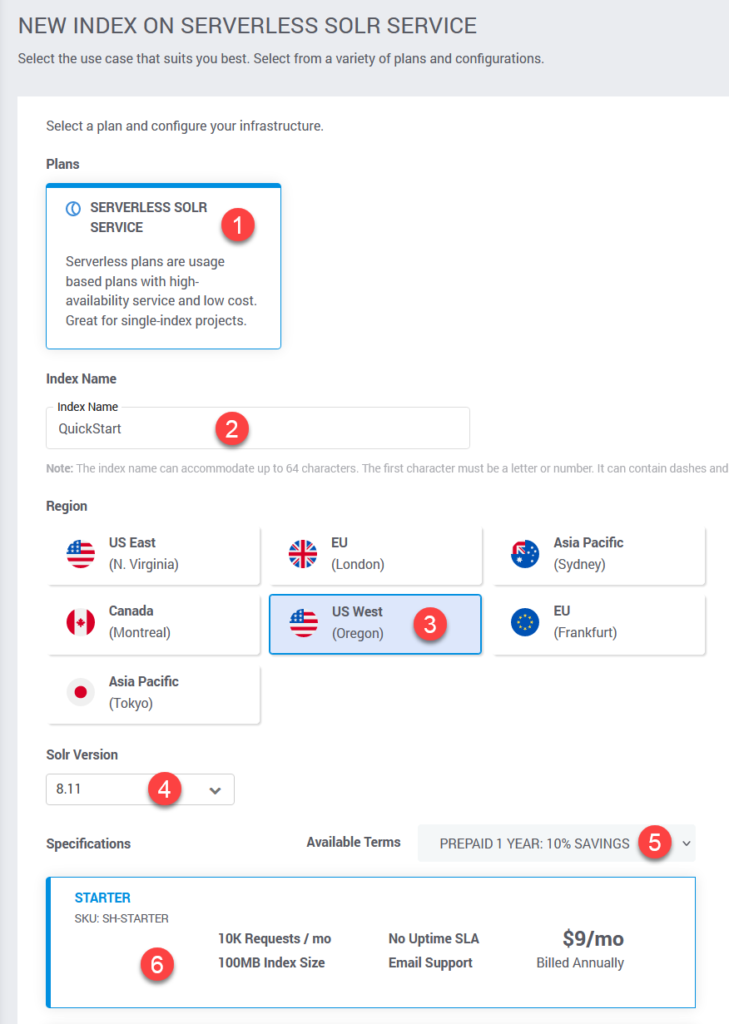
The first part of setting up an index is to choose your Solr infrastructure and billing options.

- The Serverless plan places your index on a Solr cluster that also transparently supports other indexes. The clients share the cost of the cluster. The indexes are securely isolated from one another.
- Give your index a Name.
- Select the Region that is closest to your data center.
- SearchStax supports many Solr Versions. (For the initial release of Serverless Indexes, we offer only Solr 8.11.1.)
- Available Terms: Make a term selection here to see the billing rates change in the Specifications below.
- Choose a Specification that fits your requirements and budget.
- (Not shown.) Click the Next button.
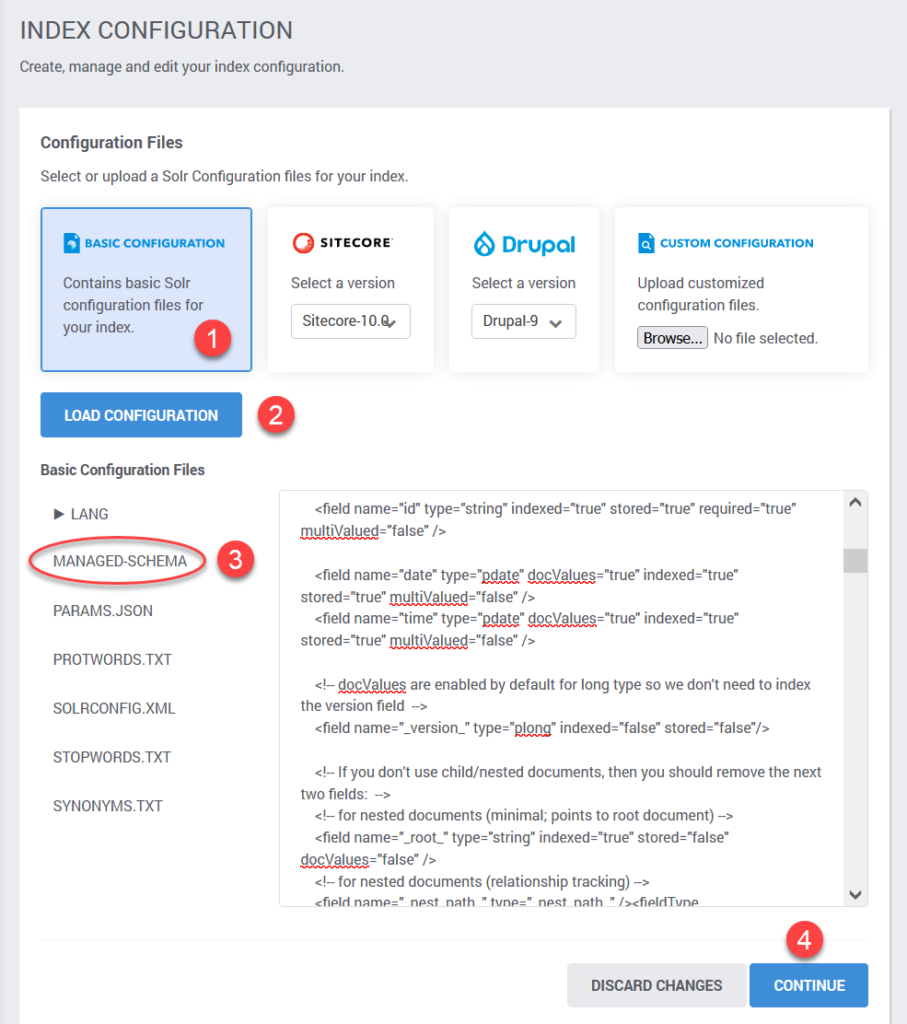
At this point, we see the Index Configuration screen. This is where we set up the index’s configuration files.

- There are three prepared profiles and one “custom” one–which means you can upload your own configuration as a *.zip file. For this exercise, choose the Basic Configuration. This is the Solr default.
- Once you’ve selected a configuration, click the Load Configuration button to load the files.
- You can examine and edit the configuration files directly on this page. For instance, it is often necessary to add fields to the managed schema file (but not for this exercise).
- After your edits, click the Continue button.
It takes thirty seconds or so to create the new index.
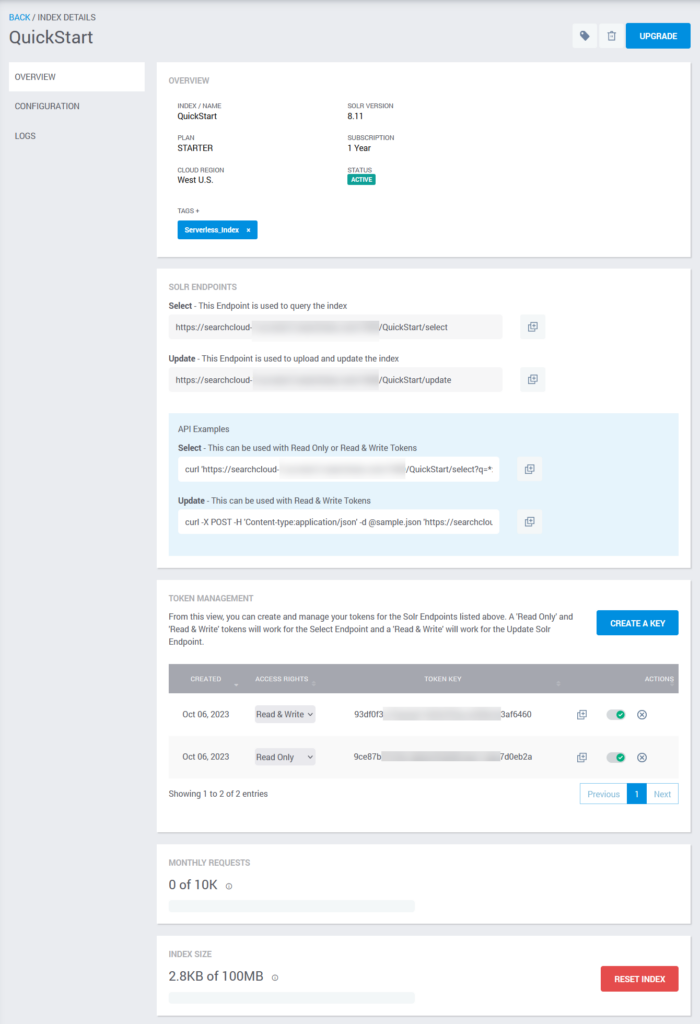
Find your index in the Serverless Index List and click on the Index Name. This opens the Index Details display.

The Reset Index button lets you clear all content from the index, which is necessary any time you update the Solr schema.
Note the Copy Icons beside the Solr Endpoints and the two Token Keys. You will need the endpoints and keys when you upload data and when you search the index (see instructions below).
3. Obtain the Data File
For the purposes of this exercise, we need to upload a file containing a minimum number of documents. We call this file sample.json. It is a simple text file containing two records:
[
 {"id" : "TestDoc1", "title_s" : "test1"},
 {"id" : "TestDoc2", "title_s" : "another test"}
]
Save this file in a convenient location.
4. Upload Documents to Solr
To upload the sample.json file to your new index, open a Bash command window (Linux) or a Cygwin command window (Windows). Navigate to the directory containing sample.json. We’re going to issue the following cURL command:
$ curl -X POST -H 'Content-type:application/json' -d @sample.json "<Update Endpoint>" -H "Authorization: Token <Write Token>"
You’ll have to paste in the Solr /update (write) endpoint and the Write Token values.
This is how it looks with all values filled in:
$ curl -X POST -H 'Content-type:application/json' -d @sample.json "https://searchcloud-us-west-2.searchstax.com/xxx/QuickStart/update" -H "Authorization: Token 934d3a3977a55caaae2f3cf1395338395338112"
Solr returns a message similar to this one when the upload is successful:
{
  "responseHeader":{
    "rf":2,
    "status":0,
    "QTime":96}}
Your index now has two documents in it. There is a delay of five minutes before the documents will be visible in a search. See Serverless Plan and API Limits for information about this delay.
5. Search the Index
To search the index, we use another simple cURL command:
$ curl "<Select Endpoint>?q=*:*&wt=json&indent=true" -H "Authorization: Token <Read Token>"
Copy the <Select Endpoint> and the <Read Token> from the Index Details page (above). Paste them into the cURL commmand:
$ curl "https://searchcloud-us-west-2.searchstax.com/xxx/QuickStart/select?q=*:*&wt=json&indent=true" -H "Authorization: Token 16778e7556f23a67ea4b1bcc09533895338a2b95"
Solr returns the search results as a JSON document similar to this:
{
  "responseHeader":{
    "zkConnected":true,
    "status":0,
    "QTime":0,
    "params":{
      "q":"*:*",
      "indent":"true",
      "wt":"json"}},
  "response":{"numFound":2,"start":0,"numFoundExact":true,"docs":[
      {
        "id":"TestDoc1",
        "title_s":"test1",
        "_version_":1736451347350290432},
      {
        "id":"TestDoc2",
        "title_s":"another test",
        "_version_":1736451347351339008}]
  }}
As you can see, Solr has found our two test documents.
That’s all there is to it. Solr is up and running.
Contact Us!
Don’t hesitate to reach out to the SearchStax Support Desk. We are happy to answer your questions.

