SearchStax Serverless Solr Indexes
Overview
The SearchStax Managed Search service lets you create two kinds of Solr Cloud projects:
- Serverless Indexes: You can set up an independent index on a server that we maintain. You can configure Solr, upload data, and send queries to it. The “serverless” Solr architecture is simple, lightweight, and very economical.
- Dedicated Deployments: A “dedicated” system is a Solr cluster devoted to your project only. This architecture is for industrial-strength systems that need high-availability, backups, alert monitoring, disaster recovery, and uptime guarantees. It is especially suitable for coordinated multi-index systems such as Sitecore and Drupal.
This page presents the SearchStax Managed Search screens and features that support Serverless Indexes.
Contents:
Creating a Serverless Index
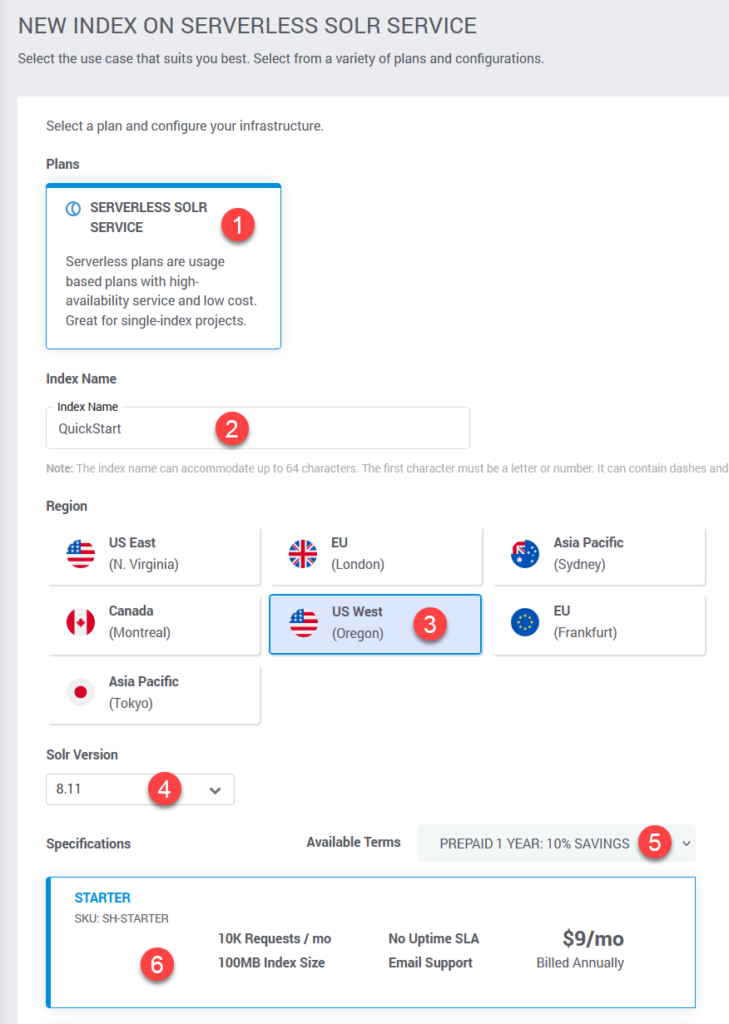
Serverless indexes are created via the SearchStax Managed Search Serverless Infrastructure screen. Click the New Index button.

- The Serverless Solr Service plan places your index on a shared Solr cluster.
- Give your project a Name.
- Select the Region that is closest to your data center.
- Select a Solr Version.
- Available Terms: Choose various term options to see how they affect the prices in the Specifications below.
- Choose a Specification that fits your requirements and budget.
- (Not shown.) Click the Next button.
Request and Index Size Limitations
Note that the Specifications differ in terms of Requests and Index Size:
- Monthly Requests: A Serverless Index is limited to a certain number of requests per month. A “request” is a message sent to either the Select or Update endpoint (see below). If the total exceeds this limit, subsequent requests will return errors.
- Index Size: This setting allocates disk space for your index. If the index exceeds this limit, subsequent Update requests will return errors.
You can view the current state of Requests and Index Size on the indexes Overview screen:
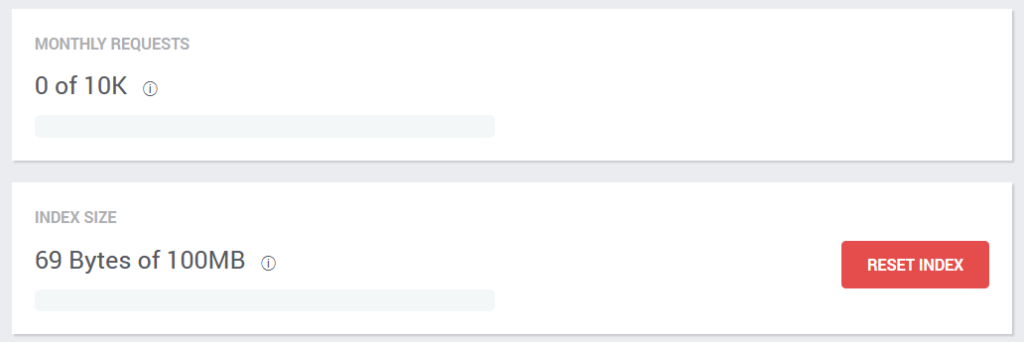
Note that the Upgrade feature (below) lets you raise these limits at any time. An upgrade takes about a minute.
The Reset Index button lets you empty the index and start over when needed.
Payment Method
If you are setting up a Free Trial, SearchStax Managed Search will skip this step and give you a 14-day grace period. Otherwise, there will be a brief digression at this point to let you create a Payment Method.
Simply enter the credit-card information and click Create Index to continue with index creation.
Solr Configurations
New Serverless Index
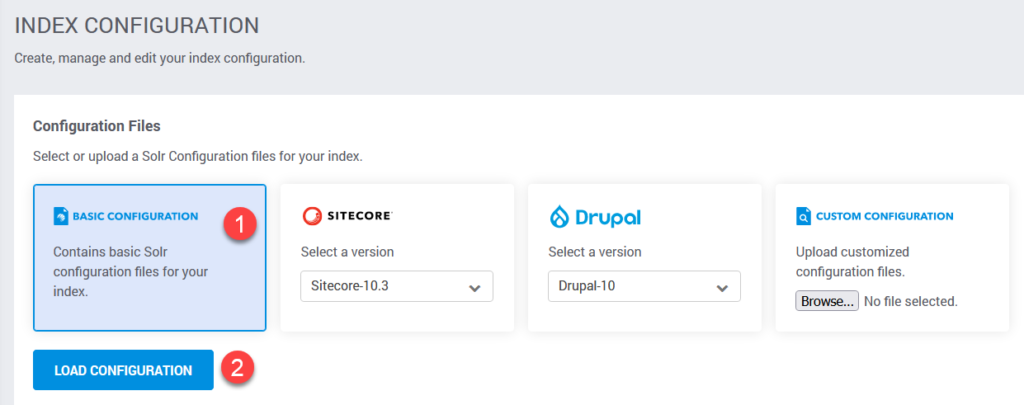
SearchStax Managed Search will offer you several Solr configuration strategies on the Index Configuration screen. These are Solr configsets representing common use cases. The config files may be edited and saved directly on this page.
- There are three prepared profiles and one “custom” one–which means you can upload your own configuration as a *.zip file. The Basic Configuration is the Solr default.
- Once a configuration is selected, click the Load Configuration button to load it.
- Click the file name on the left to view it in the edit window.
- After your edits are complete, click the Continue button.
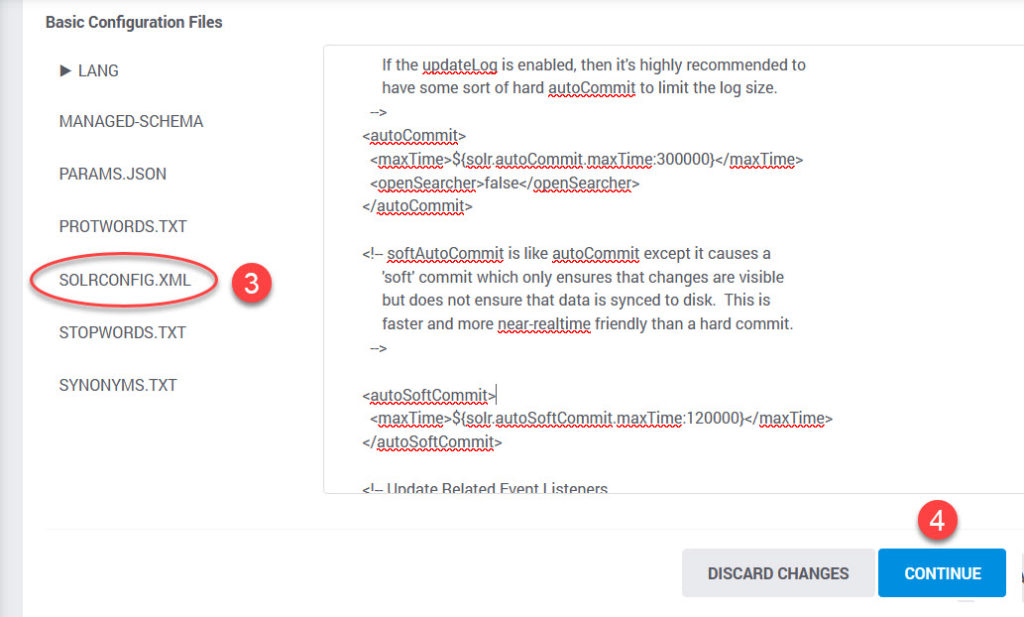
It takes about thirty seconds to create the new index. The index will appear on the Serverless Index List.
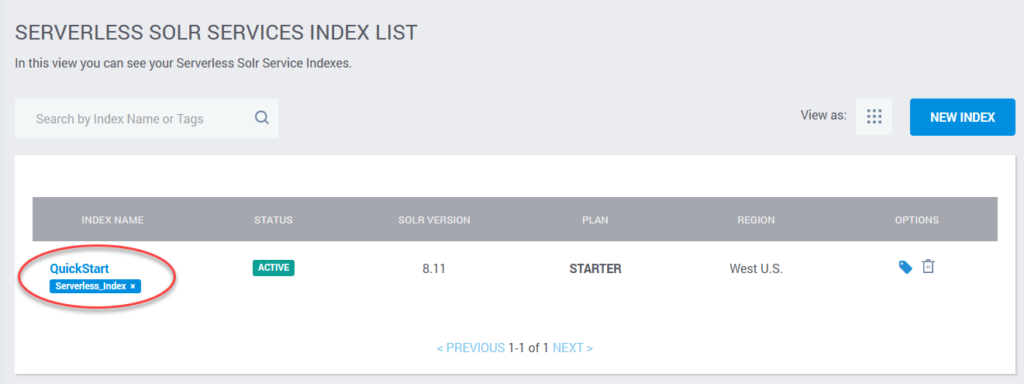
Existing Serverless Index
After your Serverless Index is running, you will probably want to return to the Configuration page to make adjustments to the Managed Schema. From the Index’s Overview page, select the Configuration Tab:
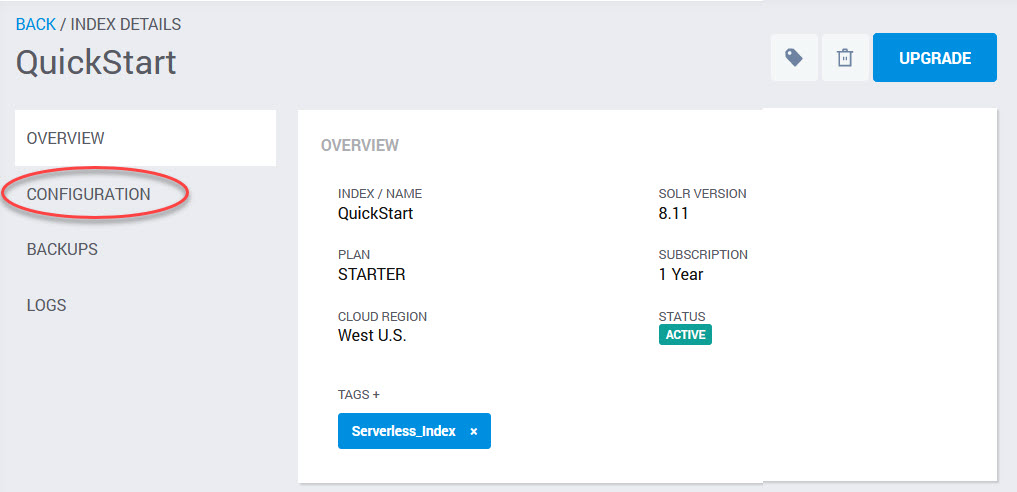
To modify the Managed Schema, follow these steps:
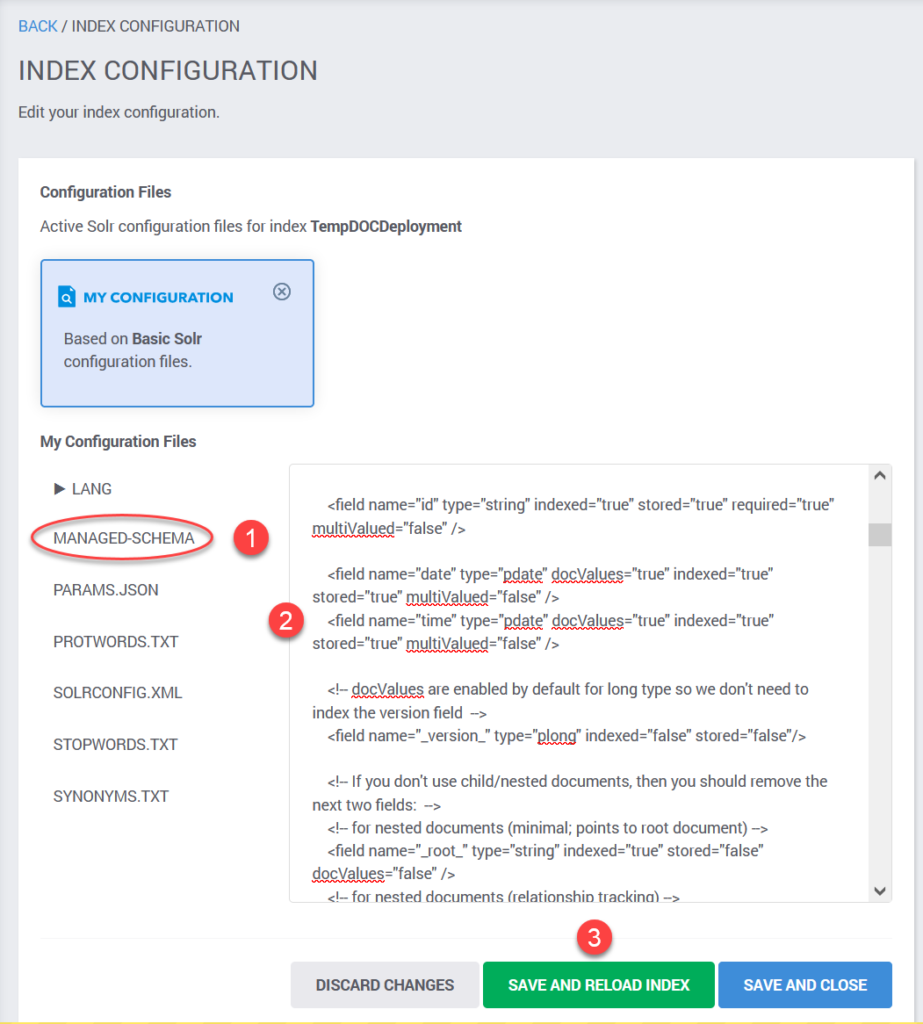
- Click the file you want to edit (Managed Schema in this case).
- Make the changes you need.
- Click the Save and Reload Index button.
Since the schema defines the index, changes to field definitions demand that we discard the existing index and rebuild it.
Index Overview
Serverless indexes are administered through the Serverless Infrastructure screen. Look for the index in the Serverless Index List. Click on the index name to open the Index Details overview.
- The Overview Tab summarizes general information about the Serverless Index.
- The Configuration Tab returns to the Index Configuration screen (previous section).
- Logs let us troubleshoot Solr. Log entries are fetched on demand.
- Tags(+) lets you attach tags to the Serverless Index.
- The Delete Button terminates the Serverless Index. (There is no way back from this action.)
- The Upgrade Button takes you to the path of upgrading the index to a plan with more capacity.

Solr Endpoints
The Index Overview display includes the Solr Endpoints, and cURL examples of their use.
- Select: The /select endpoint is the URL where you send Solr queries.
- Update: The /update endpoint is where you send documents for indexing.

The same display offers cURL examples of how to use the endpoints from a command window. Note that the endpoints and the examples have convenient copy icons (![]() ) beside them.
) beside them.
Security Tokens
There are really only two things you can do with a Serverless Index. You can Update the index, and you can Select items with a query. Both operations are secured using unique security Tokens. A token is a forty-character string similar to “5e5ba94fa0aa4899ffebff3f71c59fc953386b5d”.
Each Serverless Index comes with a Read Only (select) token and a Read & Write (update or select) token preconfigured. You can create additional tokens, delete tokens, and activate/deactivate individual tokens as you see fit. You can also change a Read Only token into a Read & Write token and the reverse.

The Token Management form is at the bottom of the Serverless Index’s Overview page.
Logs
Solr log errors pertaining to your collection may be fetched to the Logs tab of the Overview screen.
Solr Logs
Solr log entries (such as “unknown field” errors) may be fetched on demand by clicking the Fetch Solr Error Logs button on the Logs tab.
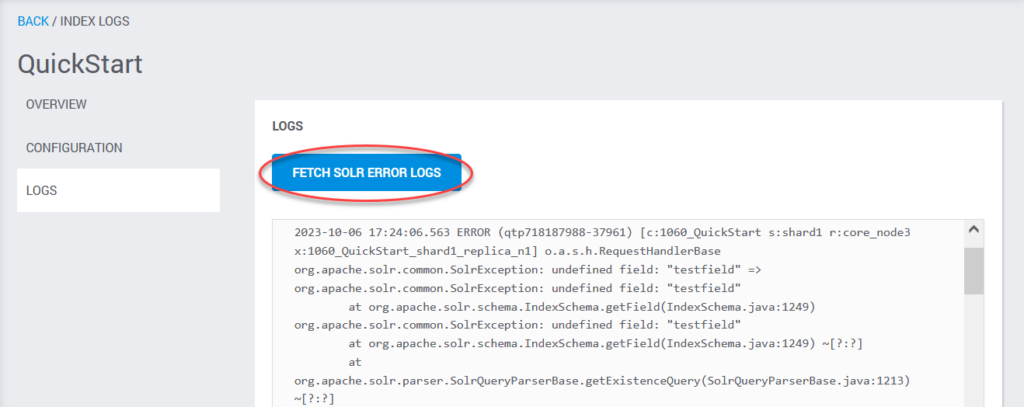
Index Creation Logs
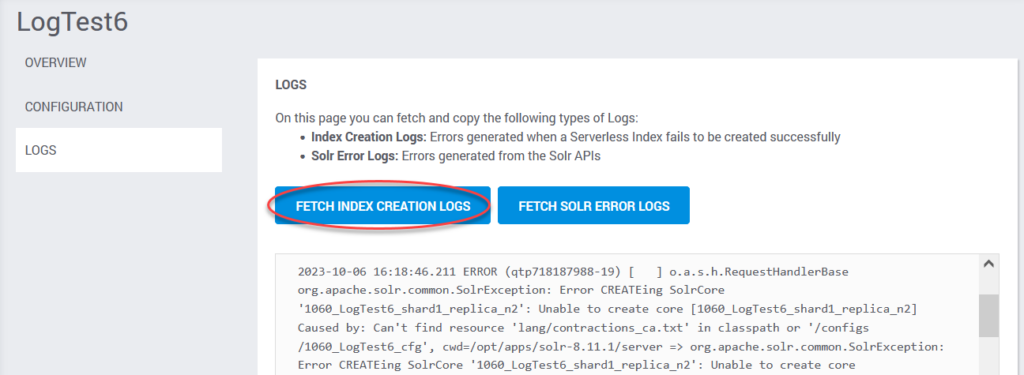
If you have created a serverless deployment, but some error in the configuration (such as a missing config file) prevented Solr from creating the index, you will see a Failed status on the deployment list.

In this situation, a second type of log file becomes available. Click the Fetch Index Creation Logs button.
Update and Select
A Serverless Index provides a basic level of Solr service. It is up to you to learn from the Solr community and apply that knowledge by setting up and querying your index. SearchStax does not teach people how to use Solr, although premium clients can purchase Advisory Services.
That said, we’ve gathered some basic pointers into this section to help you get off the ground.
Note that the examples use cURL from a Linux Bash window, but the same examples will work from a Cygwin window on Windows.
There is no need to specify a commit interval on your /update requests. Serverless collections auto-commit every five minutes.
This cURL command uploads a JSON file to the index:
curl -X POST -H 'Content-type:application/json' -d @sample.json "https://searchcloud-us-east-1.searchstax.com/xxx/QuickStart/update" -H "Authorization: Token 934d3a3977a55caaae2f3cf13123456953386112"
The following cURL command loads content into the index from a CSV file:
curl -X POST -H 'Content-type:application/csv' -d @sample.csv "https://searchcloud-us-east-1.searchstax.co/xxx/QuickStart2/update" -H "Authorization: Token 934d3a3977a55caaae2f3cf13599363335998112"
The following cURL command loads content into the index from an XML file:
curl -X POST -H 'Content-type:application/xml' -d @sample.xml "https://searchcloud-us-east-1.searchstax.co/xxx/QuickStart2/update" -H "Authorization: Token 934d3a3977a55caaae2f3cf13599363335998112"
A basic query matching all records in the index is:
curl "https://searchcloud-us-east-1.searchstax.co/xxx/QuickStart2/select?q=*:*&wt=json&indent=true" -H "Authorization: Token 16778e7556f23a67ea4b1bcc076f7795338a2b95"
Other Features
In addition to their own unique advantages, Serverless Indexes can also partake of other SearchStax Managed Search features.
- How to ask for help: You can file tickets with the SearchStax Support Desk directly from the SearchStax Managed Search Dashboard.
- Free Trial: Serverless indexes may be explored under the SearchStax Managed Search Free Trial program. You can try it out for 14 days without entering a Credit Card number.
Questions?
Do not hesitate to contact the SearchStax Support Desk.

